Introduction
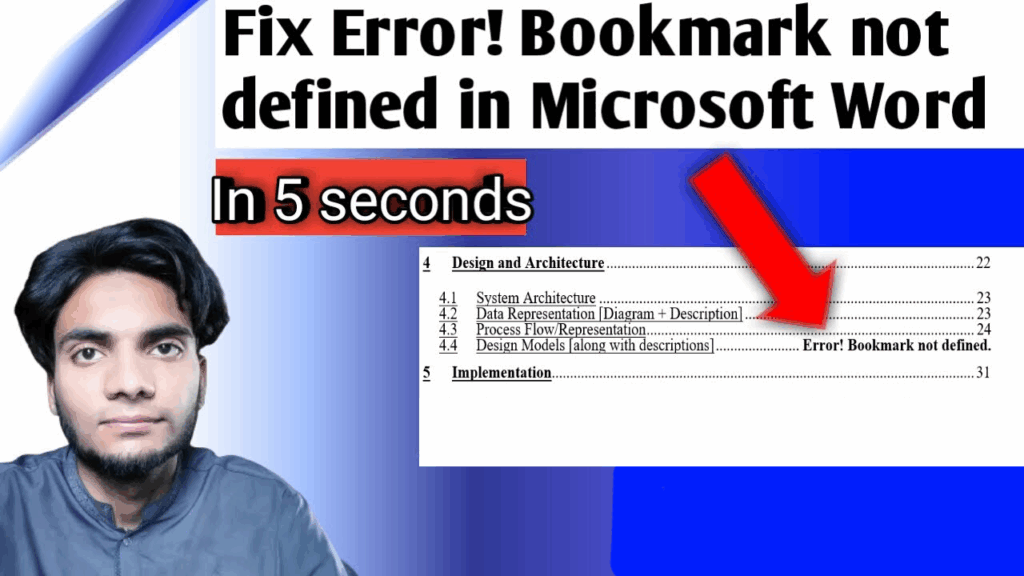
Have you ever opened your Microsoft Word document and seen a frustrating message like “Error! Bookmark not defined.” inside your Table of Contents (TOC) or anywhere else in your document?
You’re not alone — this is one of the most common issues faced by Word users while editing or updating large documents, reports, or theses that include automatic headings and references.
This error usually appears when a bookmark linked to your Table of Contents or cross-reference is missing, deleted, or renamed. The good news? It’s very easy to fix if you follow the right method.
In this guide, I’ll show you step-by-step how to fix the “Bookmark not defined” error in Microsoft Word on your laptop or computer, and make sure it never appears again — even when you export your document to PDF.
🎥 Prefer Watching the Fix Instead?
If you’re more of a visual learner or want to see exactly how it’s done, check out the video below:
📺 Want to watch this video on YouTube? Click or tap the link below:
https://youtu.be/R4UdzhOLHIQ
Summary of the Problem
When you see “Error! Bookmark not defined” in Word, it means Word is looking for a bookmark that no longer exists or has been renamed or deleted.
In most cases, this happens in:
- Table of Contents (TOC)
- Cross-references
- Linked headings or section titles
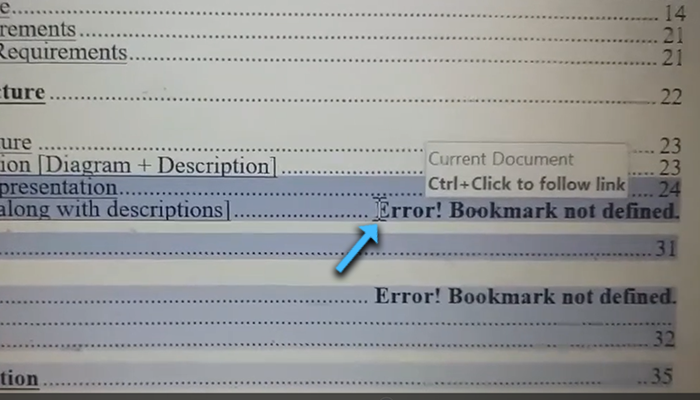
For example, if you manually deleted a heading or section that was part of the Table of Contents, Word can no longer find the bookmark for it. So instead of the proper heading name, it shows this error message.
Here’s a simple example:
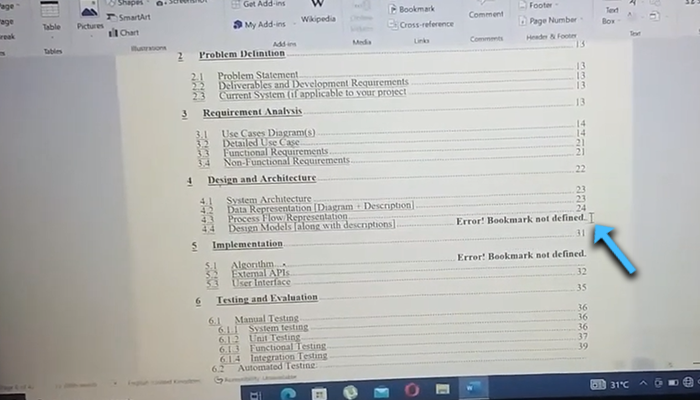
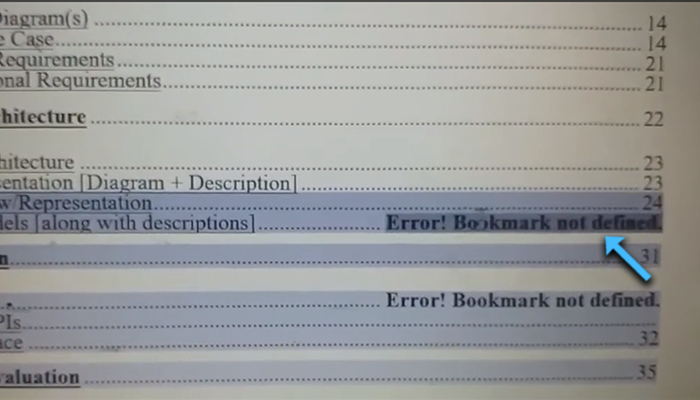
If your TOC had a link to “4.4 Design Models,” but that heading was deleted or the bookmark was never added, the Table of Contents shows:
Error! Bookmark not defined.
Luckily, this can be repaired by re-creating the missing bookmarks and reconnecting them correctly.
Steps to Fix “Error! Bookmark Not Defined” in Microsoft Word
Follow these easy steps to remove the error and restore your Table of Contents properly.
✅ Step 1: Identify the Problematic Entries
Open your Word file.
Locate the Table of Contents section.
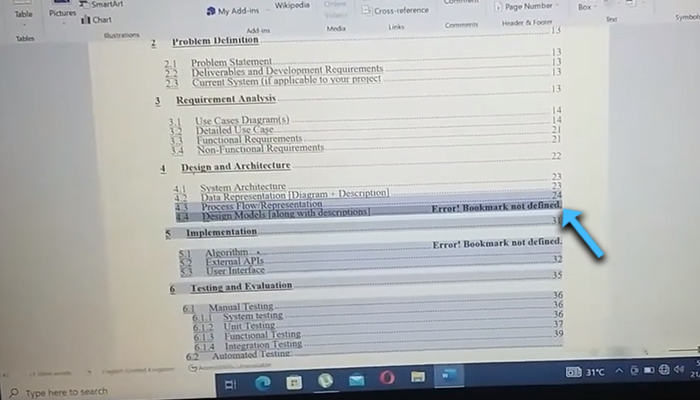
Find all instances where “Error! Bookmark not defined.” appears.
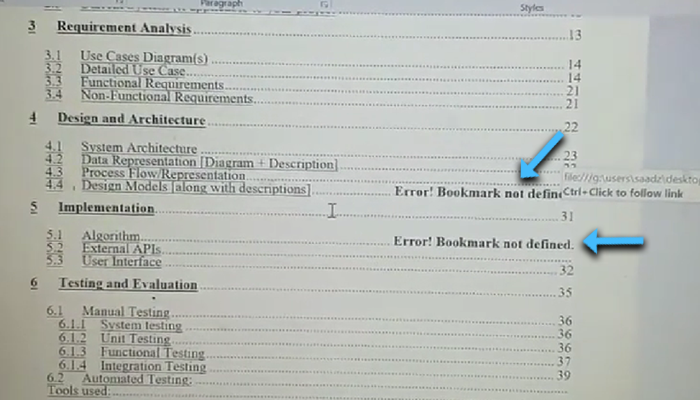
Note down the sections or titles for which the error appears.
(Example: “Design Models” and “Algorithm One.”)
✅ Step 2: Test the Existing Bookmarks
Hover your mouse over the working items in your Table of Contents (those that don’t show errors).
Hold the Ctrl key and click on one of them.
If it takes you to the correct heading in your document, that bookmark is properly defined.
Now repeat the same for the ones showing the error.
If the cursor jumps to the top of the page or nowhere relevant, it means that the bookmark is missing for that entry.
This confirms which sections you need to fix.
✅ Step 3: Add Missing Bookmarks
Now that you know which items are missing bookmarks, you can add them manually.
Go to the heading or section in your document where the error originated.
(For example, go to “4.4 Design Models.”)
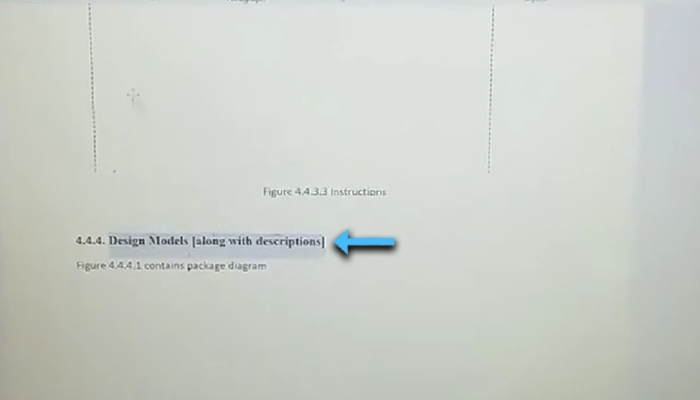
Select the heading text (like “Design Models”).
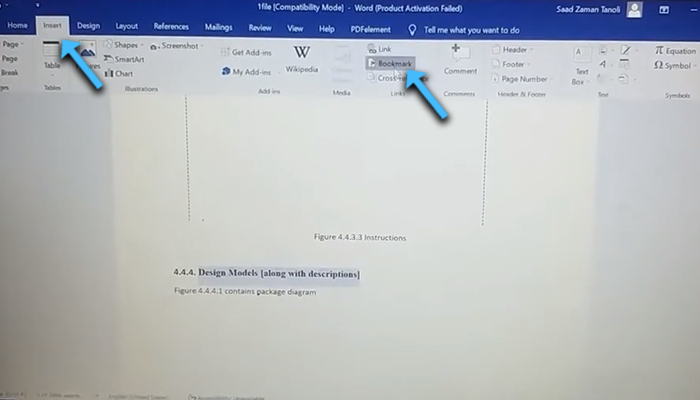
On the top ribbon, click Insert > Bookmark.

In the dialog box that appears:
Enter a bookmark name (for example, designmodel).
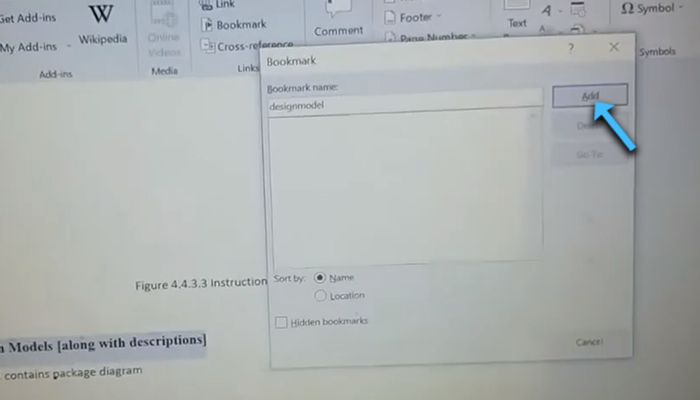
Click Add.
Repeat the same process for the next missing section (for example, “Algorithm One”), giving it a bookmark name such as algo.
Now both bookmarks are properly created.
✅ Step 4: Reconnect the Table of Contents Entries
Once the bookmarks are added, you must link the Table of Contents entries to these bookmarks.
Go back to the Table of Contents.
Select the text from right to most left (For example, “ 4.4 Design Models [along with description]………Error! Bookmark not defined.”).
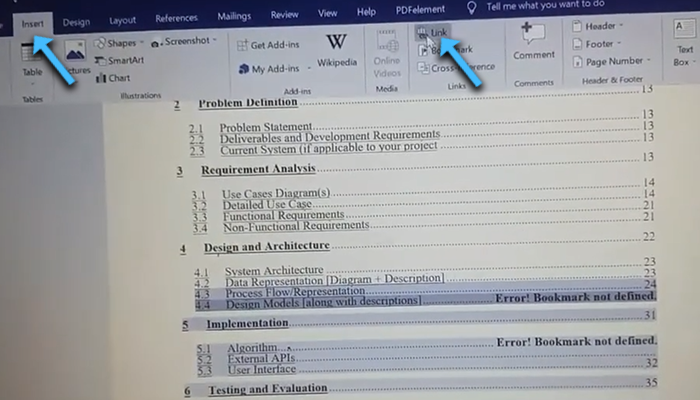
Click Insert > Link (or Hyperlink).
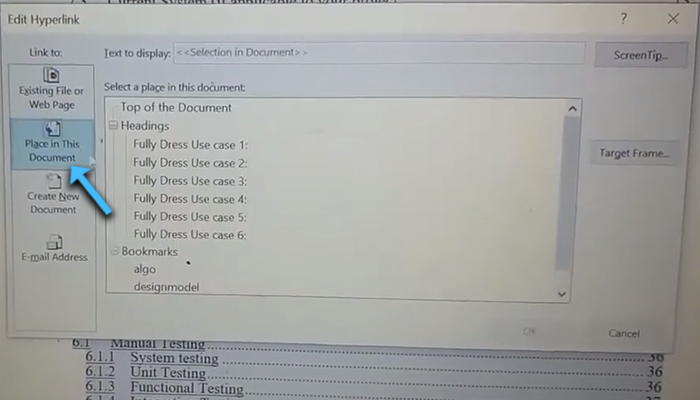
Choose Place in This Document.
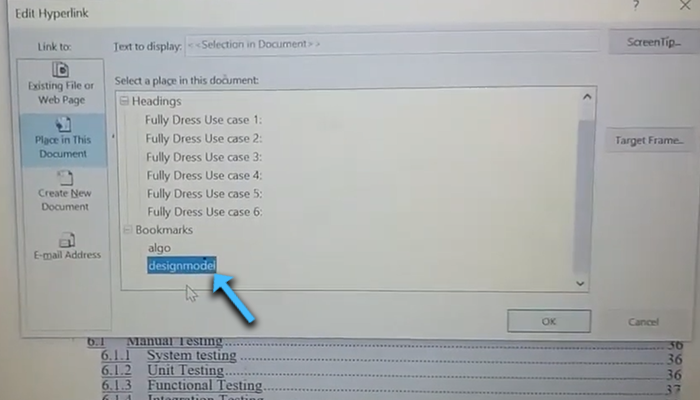
From the list of available bookmarks, select the correct one (for example, designmodel for Design Model).
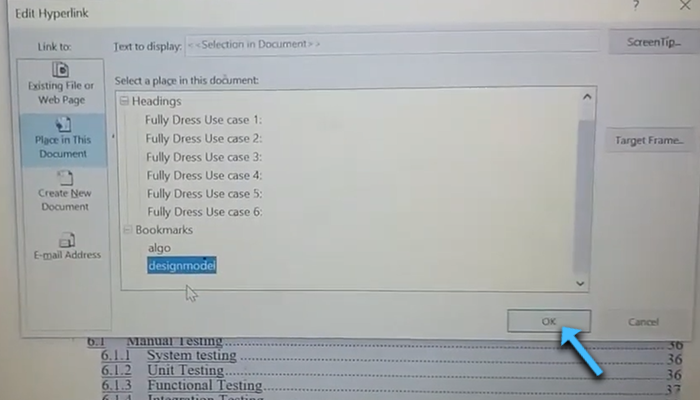
Click OK.
Do the same for the second error: For “Algorithm One,” select the bookmark algo.
✅ Step 5: Replace the Error Text
Select the “Error! Bookmark not defined.” text from left to right.

Press Backspace key to remove it completely.

Manually type the correct section name and page number where that content is located.
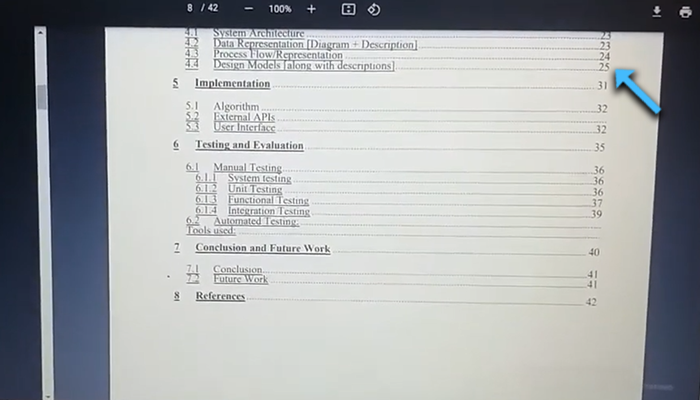
- Example: “Design Model ……………………………….. 25”
- Example: “Algorithm One ……………………………… 32”
Make sure the page numbers match where those sections actually appear in your document.
✅ Step 6: Refresh the Table of Contents
Select all the Table of Contents only.
Press Ctrl + P (Print Preview shortcut) to refresh fields.
Check if the “Bookmark not defined” error is gone.
If everything is correctly linked, Word will now display a clean Table of Contents without any bookmark error messages.
✅ Step 7: Save and Export to PDF (Optional)
To confirm that everything works perfectly:
Save your file.
Export or Save As → PDF.
Open the generated PDF and scroll to your Table of Contents.
You’ll notice that no “Error! Bookmark not defined” messages appear, and all TOC links now work properly.
❓ Frequently Asked Questions (FAQs)
Q1: Why does the “Error! Bookmark not defined” appear in Word?
Answer: It appears when a bookmark or heading linked in the Table of Contents or a cross-reference is missing, deleted, or renamed.
Q2: Can I just delete the error message manually?
Answer: You can delete it, but if the link remains broken, it will reappear the next time you update the Table of Contents. Always fix the missing bookmark first.
Q3: How do I see all bookmarks in a Word document?
Answer: Go to Insert > Bookmark. A list of all existing bookmarks will appear. You can also enable “Show Bookmarks” in Word Options to view them in your document.
Q4: Can this error occur when converting to PDF?
Answer: Yes, if your Word document still contains missing bookmarks before exporting, the same “Bookmark not defined” error will appear in the PDF file as well.
Q5: What if my entire Table of Contents shows “Bookmark not defined”?
Answer: That usually means your TOC got corrupted. Delete the current TOC and insert a new one from References > Table of Contents.
Q6: Does updating fields (F9) help?
Answer: Yes. Pressing F9 refreshes all fields and bookmarks in the document, helping fix or detect missing links after you’ve re-added bookmarks.
Final Result
After following these steps, your document should have:
- A fully working Table of Contents with no “Error! Bookmark not defined” messages.
- Properly linked bookmarks for all headings.
- A clean PDF export without any bookmark issues.
This process ensures your report, thesis, or assignment looks professional and error-free.
Additional Tip
Always make a habit of adding bookmarks for every heading or important section before inserting the Table of Contents.
You can also use Word Styles (Heading 1, Heading 2, etc.) to automatically generate a TOC with built-in bookmarks. This minimizes manual linking and prevents future errors.
🏁 Conclusion
The “Error! Bookmark not defined” issue in Microsoft Word can look alarming, but it’s actually easy to fix once you understand why it happens.
By re-creating the missing bookmarks, relinking your Table of Contents, and updating your fields, you can quickly restore your document to its correct format.
Next time you face this error, just remember:
Check bookmarks → Add missing ones → Reconnect links → Refresh TOC.
Follow this simple rule, and you’ll never see the “Bookmark not defined” error again in Word or in your exported PDFs.